If your LTI Advantage LMS is not otherwise specified, the following steps apply to any LTI Advantage compliant LMS.If your LTI 1.0 LMS is not otherwise specified, the following steps apply to any LTI 1.0 compliant LMS. Copy an existing WebAssign course to a new LMS course. You can copy your own WebAssign course or another instructor's course.
To copy both your LMS course and WebAssign course at the same time, see Copy Your WebAssign-Integrated Course in LMS.
To copy another instructor's course, ask the instructor for the class key of the course to be copied.
Before you begin, your LMS administrator must have set up the Cengage tool in your LMS, and you must have received an email from Cengage containing a Cengage Course URL.
This task is different depending on the version of Google Classroom your school uses.
- If your assignment has Add-ons, your school uses Google Workspace for Education Plus.
- If your assignment does not have Add-ons, your school uses Google Workspace for Education Fundamentals/Standard.
-
Click
 > Turn editing on.
-
If you have not already done so, create a module in your course.
-
Drag
 from Build Outline to
the course outline.
from Build Outline to
the course outline.
Alternatively, click
and
select the module location.
-
Drag
-
Drag
 from Add Content to your
module.
from Add Content to your
module.
Alternatively, click
and
select your module. -
Open the Cengage integration tool.
If your school uses Google Workspace for Education Plus:
This integration method imports one link at a time. To import multiple links at once, follow the instructions for Google Workspace for Education Fundamentals/Standard.
- Open your LMS course.
- Open the assignment editor.
-
In Add-ons, click
 Cengage Classroom.
If your school uses Google Workspace for Education Fundamentals/Standard:
-
Click
 >
>  Cengage.
-
Create a course link or select learning activities to link from LMS.
To create direct links to learning activities:
You can also create a course link with this option.
-
Select activities to include in your class.
Note
Selecting a group of activities does not select all activities in the group. You must select each activity individually.
Expand or collapse the course outline if needed.
If you're using the Google Workspace for Education Fundamentals/Standard workflow, you can select multiple activities.
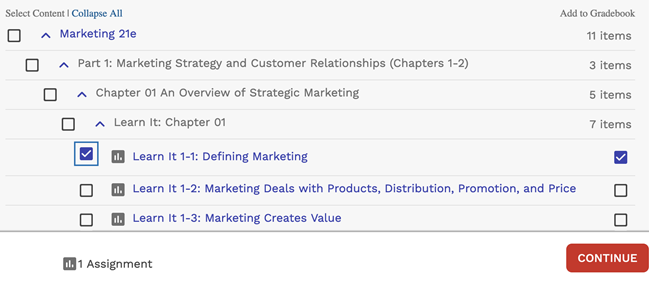
Graded activities that have already been added are marked
 . To avoid
duplicate activity links and gradebook columns, do not import the same activity
twice.
. To avoid
duplicate activity links and gradebook columns, do not import the same activity
twice.Due dates set in your WebAssign course are synced to LMS. If your school uses a LMS Partner integration, available dates are also synced to LMS.
Date changes in your WebAssign course overwrite dates set in your LMS course. For consistency, make sure your WebAssign and LMS courses are set to the same time zone.
Due dates set in your WebAssign course do not sync to your LMS course.
To create a course link only:
- Click Add Course Link.
- Blackboard Original: Review the settings, select where to put your course link, and click Submit.
-
Select activities to include in your class.