If your LTI Advantage LMS is not otherwise specified, the following steps apply to any LTI Advantage compliant LMS.If your LTI 1.0 LMS is not otherwise specified, the following steps apply to any LTI 1.0 compliant LMS. After setting up your WebAssign course, create links from LMS to activities or other content in WebAssign. Linked graded activities are included in the LMS gradebook unless you choose to exclude them. Linked graded activities are included in the LMS gradebook.
Before adding links to WebAssign activities, make sure your WebAssign course is set up the way you want it.
- Add and organize the assigned activities and course materials for your WebAssign course.
- Configure assignment settings such as grading, attempts, feedback, time limits, due dates, point values, and grade categories.
The following steps for an LTI 1.0 integration. For LTI Advantage instructions, see Brightspace LTI Advantage.
Links created in this way are sometimes called deep links because they are not just web links but allow data to be exchanged between LMS and WebAssign.
This task is different depending on if your school uses the paid or free version of Google Classroom.
- If your assignment has Add-ons, your school uses the paid version.
- If your assignment does not have Add-ons, your school uses the free version.
The paid Google Classroom version adds links to Google Classroom assignments, while the free version adds links directly to the Classwork tab.
-
Drag
 from Add Content to your
module.
from Add Content to your
module.
Alternatively, click
and
select your module. -
Click
 > Turn editing on.
-
Click Select Content and select activities to include in your class.
Note
Selecting a group of activities does not select all activities in the group. You must select each activity individually.
Expand or collapse the course outline if needed.
If you're using the free Google Classroom workflow, you can select multiple activities.
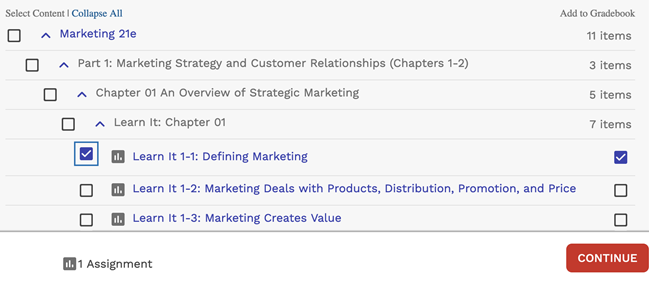
Graded activities that have already been added are marked
 . To avoid
duplicate activity links and gradebook columns, do not import the same activity
twice.
. To avoid
duplicate activity links and gradebook columns, do not import the same activity
twice.Due dates set in your WebAssign course are synced to LMS. If your school uses a LMS Partner integration, available dates are also synced to LMS.
Date changes in your WebAssign course overwrite dates set in your LMS course. For consistency, make sure your WebAssign and LMS courses are set to the same time zone.
Due dates set in your WebAssign course do not sync to your LMS course.
If needed, change gradebook syncing for specific activities.
By default, when you include a graded activity it is added to the LMS gradebook.
To remove an activity from the gradebook, clear Add to Gradebook.
To sync an activity to the gradebook without creating an activity link, first select Add to Gradebook and then clear the Add to Course checkbox on the left.
The content page displays all the links you have added to your WebAssign course and activities.
The selected links are added to the module.
Your link is added to the Sakai® Lessons area.
If needed, you can reorganize the links in LMS.
Paid Google Classroom with add-ons
This integration method imports one link at a time. To import multiple links at once, follow the instructions for the free version of Google Classroom.
-
Open the Cengage integration tool.
- Open your LMS course.
- Open the assignment editor.
-
In Add-ons, click
 Cengage Classroom.
-
Click Select Content and select activities to include in your class.
Note
Selecting a group of activities does not select all activities in the group. You must select each activity individually.
Expand or collapse the course outline if needed.
If you're using the free Google Classroom workflow, you can select multiple activities.
Graded activities that have already been added are marked
. To avoid
duplicate activity links and gradebook columns, do not import the same activity
twice.Due dates set in your WebAssign course are synced to LMS. If your school uses a LMS Partner integration, available dates are also synced to LMS.
Date changes in your WebAssign course overwrite dates set in your LMS course. For consistency, make sure your WebAssign and LMS courses are set to the same time zone.
Due dates set in your WebAssign course do not sync to your LMS course.
If needed, change gradebook syncing for specific activities.
By default, when you include a graded activity it is added to the LMS gradebook.
To remove an activity from the gradebook, clear Add to Gradebook.
To sync an activity to the gradebook without creating an activity link, first select Add to Gradebook and then clear the Add to Course checkbox on the left.
Free Google Classroom
-
To open the Cengage integration tool, click
 >
>  Cengage.
-
Click Select Content and select activities to include in your class.
Note
Selecting a group of activities does not select all activities in the group. You must select each activity individually.
Expand or collapse the course outline if needed.
If you're using the free Google Classroom workflow, you can select multiple activities.
Graded activities that have already been added are marked
. To avoid
duplicate activity links and gradebook columns, do not import the same activity
twice.Due dates set in your WebAssign course are synced to LMS. If your school uses a LMS Partner integration, available dates are also synced to LMS.
Date changes in your WebAssign course overwrite dates set in your LMS course. For consistency, make sure your WebAssign and LMS courses are set to the same time zone.
Due dates set in your WebAssign course do not sync to your LMS course.
If needed, change gradebook syncing for specific activities.
By default, when you include a graded activity it is added to the LMS gradebook.
To remove an activity from the gradebook, clear Add to Gradebook.
To sync an activity to the gradebook without creating an activity link, first select Add to Gradebook and then clear the Add to Course checkbox on the left.