
Lab 7 - Solid State Modeling
Purpose
-
ATo explore some simple solid state structures.
-
BTo explore unit cell stoichiometry.
Goals
-
•To visualize the three-dimensional arrangement of atoms and ions in common solid state structures.
-
•To determine the stoichiometry of unit cells.
-
•To gain a working knowledge of unit cells, packing efficiency, coordination numbers and their relationship to each other.
Introduction
The solid state is the least energetic of the three common states of matter. Atoms and ions are packed together in a regular arrangement. The arrangement is normally one that minimizes the energy of the particles by maximizing the interaction of positive and negative charges. Maximizing the contact between atoms, which maximizes the dispersion forces holding atoms and molecules together, also minimizes energy. Thus, atoms and ions are often packed in a spatially efficient manner with alternating charges. When this ordered arrangement extends throughout the entire crystal in very well defined and repeating patterns (a crystal lattice), the solid is considered crystalline. If the arrangement is not as repetitive (local order), the solid is amorphous. This experiment deals only with crystalline solids. Although this description might lead you to believe that there is only one best way to arrange atoms to minimize their energies, there are actually many different ways atoms and ions can pack to achieve this. The arrangement a particular compound or material chooses depends to a large extent on the size and charge of the particles. The three simplest and common lattices are:-
•Simple cubic or primitive in which identical particles are found on the eight corners of a cube.
-
•Body centered cubic in which identical particles are found on the eight corners plus one in the center of the cube.
-
•Face centered cubic in which identical particles are found on the eight corners plus the six faces of the cube.
Equipment
-
1 Solid-State Model Kit
-
1 ruler
About the Model Kit
This model kit was developed by the Institute for Chemical Education at the University of Wisconsin - Madison. The instruction pages that follow are reprinted with permission from the Institute for Chemical Education (ICE), John W. Moore, director. The Chemistry Department of North Carolina State University wishes to express thanks to ICE for permission to reproduce these pages. Contents of the model kit. When you open the model kit, you will notice a series of boxes and/or bags containing different colored spheres. These will be our atoms and ions. There are also two square plastic blocks with holes drilled in them. These will be the bases. Notice that one has a circular sticker and the other a semicircular sticker. There are also a number of square paper templates with holes punched in them. Each has either a circle or semicircle in the corner and a letter to identify it. There is also a long plastic tube with metal rods in it. Assembling the structure base. Instructions for assembling each solid state base appear on the ensuing pages. In each case, a paper template is placed on top of one of the bases, with the circle or semicircle aligned. The metal rods are then inserted into specific holes in the template, as instructed. The structure is then built up, layer by layer. Taking a model apart. To take a model apart, invert the structure and allow the spheres to slowly slide off the rods. Try to make sure the spheres do not roll away. Remove the rods by grasping near the base and pulling without bending or wiggling. Instructions for assembling the solid state structures. Instructions for each of the structures in this lab are given on the ensuing pages. For each structure, pictures are reproduced from the instruction manual that accompanies the model kits. They include a picture of the template in the upper right hand corner and the pattern of holes that are used on that template in the upper left hand corner. Next to each hole in the pattern is a number, which corresponds to a layer of atoms. Building the layers in numerical order forms structures. Usually the top layer of the structure is a repeat of layer number 1, and is referred to as layer 1'. You will notice that some of the numbers are black and others are white. The black and white numbers correspond to different color spheres, as given by the key at the bottom left corner. This experiment will be using the colorless, green and blue spheres. There is also a picture of the "unit cell layers". This shows a picture of the arrangement of each layer of the unit cell. Use the instructions provided to assemble each structure using the entire shaded area of the template. Do not build your structures based on the "unit cell layers", because it will not give a large enough portion of the structure to allow you to answer the questions for the non-cubic cells. Follow the typed instructions for each structure. These will give you step by step instructions on building the models. Also, you will be asked to view the structures as you assemble them and answer questions about them.Reagents
No chemicals will be used in this experiment.Safety
None of the materials being used in this experiment present a safety hazard. However, the work is being done in a laboratory and the usual rules about eye protection and proper clothing apply.Waste Disposal
Since no chemicals are being used in this experiment, there will not be any waste for disposal.Lab Procedure
You will notice the format of this lab experiment is different than other experiments. You will build a series of solid state structures. Directions for building each structure are intermingled with questions to help you with your observations. Please answer the questions in your lab manual along with any other observations you make while you are building the structures. Please print the worksheet for this lab. You will need this sheet to refer to.
Part A: Some Simple Structures
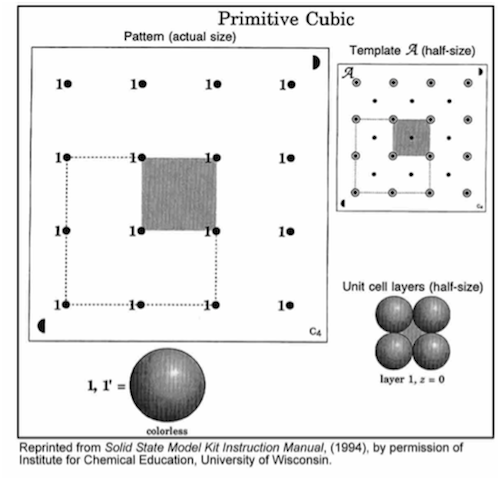
Figure 1
-
•Position the semicircle on template A in the same corner as the matching semicircle on the base, and align the holes.
-
•Insert rods in the 4 circled holes in the shaded region.
-
•Place a single atom on one of the 4 rods.
-
•Build the rest of layer 1.
-
•Complete the unit cell by repeating the first layer (1').
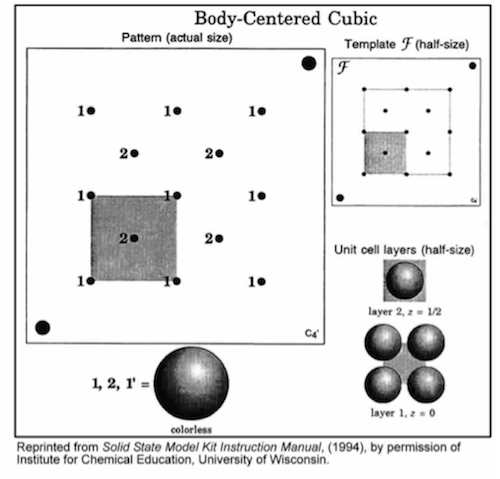
Figure 2
-
•Position the circle on template F in the same corner as the matching circle on the base, and align the holes.
-
•Insert rods in all 5 holes in the shaded region.
-
•Place a single atom at one of the layer 1 positions.
-
•Complete layer 1 and then layer 2.
-
•Complete the unit cell by repeating the first layer (1').
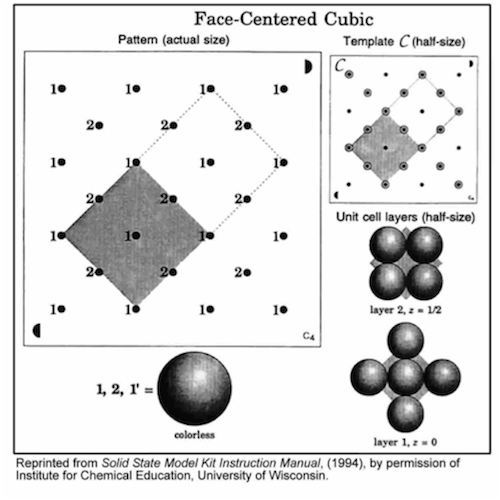
Figure 3
-
•Carefully disassemble your simple cubic structure.
-
•Position the semicircle on template C in the same corner as the matching semicircle on the base, and align the holes.
-
•Insert rods in all 9 holes in the shaded region.
-
•Build each layer in numerical order. Finish each layer before starting the next layer.
-
•Complete the unit cell by repeating the first layer (1').
-
•Carefully disassemble the two remaining structures.
Part B: Unit Cell Stoichiometry
Structure 4: Sodium Chloride (use template C)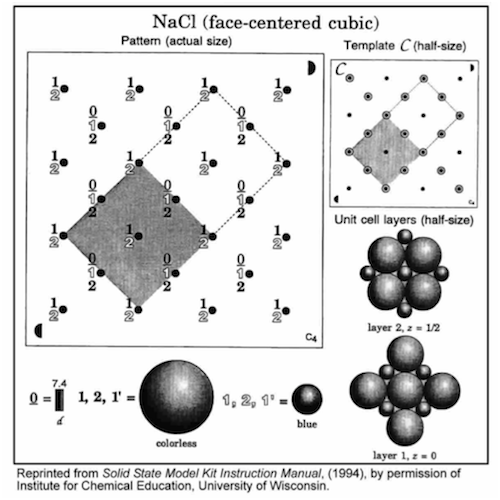
Figure 4
-
•Position the semicircle on template C in the same corner as the matching semicircle on the base, and align the holes.
-
•Insert rods in all 9 holes in the shaded region.
-
•Build each layer in numerical order: 0, 1,
 , 2 and
  . (Layer 0, grey straw spacers,
must be assembled first!) Finish each layer before starting the next layer.
. (Layer 0, grey straw spacers,
must be assembled first!) Finish each layer before starting the next layer.
-
•Complete the unit cell by repeating the first layer (1',
 ).
).
-
•Carefully disassemble this structure.
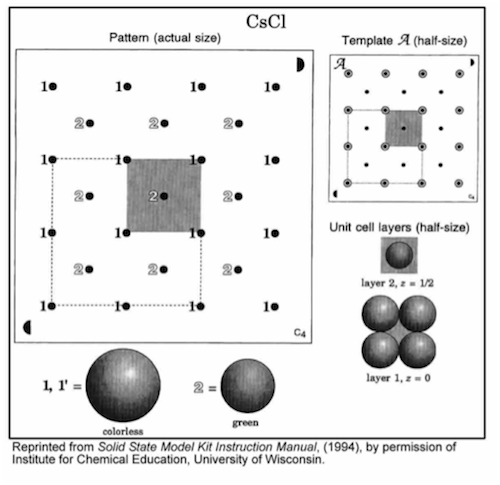
Figure 5
-
•Position the semicircle on template A in the same corner as the matching semicircle on the base, and align the holes.
-
•Insert rods in all 5 holes in the shaded region.
-
•Build each layer in numerical order: 1 and. Finish each layer before starting the next
layer.
-
•Complete the unit cell by repeating the first layer (1').
-
•Carefully remove the four colorless atoms of layer 1'.
-
•Insert rods in to the remaining 8 holes in the region indicated by the dashed square.
-
•Complete layer 1 with colorless spheres. Note: There should be nine total.
-
•Complete layer with four green spheres.
-
•Repeat layers 1 and.
-
•Carefully disassemble this structure.
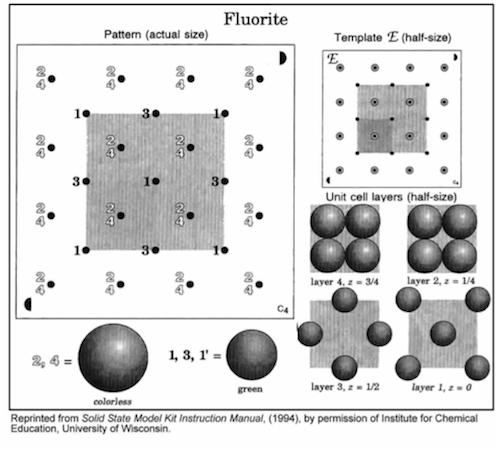
Figure 6
-
•Position the semicircle on template E in the same corner as the matching semicircle on the base, and align the holes.
-
•Insert rods in all 13 holes in the shaded region.
-
•Build each layer in numerical order, 1 through 4. Finish each layer before starting the next layer.
-
•Complete the unit cell by repeating the first layer (1').
-
•Carefully disassemble this structure.
-
•Reassemble the contents of the model kit and return it to where you found it at the beginning of the lab period.
-
•Before leaving, go to a computer in the laboratory and enter your results in the In-Lab assignment. If all results are scored as correct, log out. If not all results are correct, try to find the error or consult with your lab instructor. When all results are correct, note them and log out of WebAssign. The In-Lab assignment must be completed by the end of the lab period. If additional time is required, please consult with your lab instructor.