Lab 2 - Flame Tests
Purpose
To determine the identities of ions in two solutions of unknown composition by comparing the colors they produce in flame tests with colors produced by solutions of known composition.
Goals
-
•
To gain practice using a Bunsen burner.
-
•
To observe flame test colors produced by ions in solution.
-
•
To compare flame test colors produced by known ions in solution with those produced by unknown ions in solution.
-
•
To use deductive reasoning to identify the unknown ions in solution.
Introduction
When many people hear the word radiation, their first thought is something radioactive. However, a scientist thinks about energy moving through space in a series of waves called electromagnetic (EM) radiation or radiant energy. Electromagnetic radiation surrounds us! Natural sources of radiation from the sun, radioactive decay, and even the luminous glow from fireflies contribute to the electromagnetic radiation around us. Artificial sources such as radio and television, microwave radar detection systems, telephone signals, light bulbs, and medical equipment, are also contributors. We have learned a great deal about nature and the structure of the atom by monitoring radiation with microscopes, telescopes and other scientific equipment. The continuum of this radiation is known as the electromagnetic spectrum. It includes x-rays and gamma rays; ultra-violet, visible, and infrared light; microwaves and radiowaves. Human vision is limited to the very narrow band of visible light.
Electromagnetic radiation can be described as a wave characterized by two interdependent variables:
-
Frequency, ν (nu), is the number of waves passing a certain point per second. Frequency is measured in Hertz (Hz). 1 Hz = 1 cycle/sec.
-
Wavelength, λ (lambda), is the distance between a point on one wave and the corresponding point on the next wave. Wavelength is measured in units of length, which are convenient for the type of radiation being considered. Radio waves are measured in meters (m). Visible and ultraviolet light are measured in nanometers. 1 nm = 10-9 m.
The product of these two variables is the distance the wave travels in a second and is a constant known as the speed of light, c,
( 1a )
c = λν = 3.0 × 10⁸ m/s
Thus, electromagnetic radiation with a high (large) frequency has a short (small) wavelength and vice versa. Frequency and wavelength are inversely proportional, as shown below in the rearrangements of equation 1a c = λν = 3.0 × 10⁸ m/s
:
A third variable in the wave is the amplitude, the intensity of the radiation; for visible light, this is perceived as brightness. Therefore, if we look at a given shade of blue, it will always have the same frequency and wavelength, but can be of different amplitudes.
Another descriptor for radiation is chromaticity. Light can be monochromatic (a single wavelength) or polychromatic (many wavelengths such as white light). Light can also be described in terms of bundles of energy called photons. Each photon has an energy, E, proportional to its frequency:
In this equation, h is Planck's constant, 6.626 × 10⁻³⁴ J · s.
If all of the colors in the visible spectrum are mixed, the result appears as white light. When a material appears colored, you are selectively seeing some wavelengths (or frequencies, or energies) and not others. Colors can arise from two different, but closely related, processes that can be understood at the atomic and molecular level. These processes are absorption and emission.
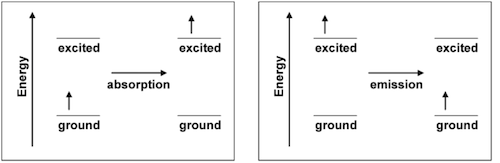
Electrons in atoms, molecules, and ions ordinarily occupy the lowest energy orbitals that are available to them. This lowest energy configuration is called the ground state. However, when the atom, molecule or ion absorbs energy, one of its electrons can be promoted from a low energy orbital into a higher energy orbital and produce what is called an excited state. Atoms, molecules and ions can absorb or emit energy in the form of heat, electricity or light. During absorption, an electron is promoted from the ground to the excited state. During emission, an electron goes from the excited to the ground state.
When white light shines on a colored substance, some of the wavelengths that make up white light (colors) are absorbed. The remaining wavelengths, or colors, are reflected back from the colored substance or transmitted through it. Our eyes interact with the reflected or transmitted rays, and produce our perception of the color of the substance. Consequently, the characteristic color of a material is not the color of light that it absorbs; it is the mixture of the reflected or transmitted colors. For example, if an object absorbs all visible wavelengths but red, red is reflected or transmitted, and we perceive the object as red.
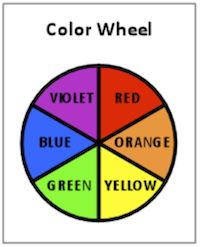
The color we see is the complementary color of that which was absorbed. Complementary colors are best shown on a color wheel, which is well known to art students. A simple color wheel is shown in Figure 2. Complementary colors are opposite each other on the color wheel.
For example, if red is absorbed and all other colors reflected, we may see the complementary color of red, which is green. It is interesting to note that the average human eye can see up to 4000 shades of red but only about 400 shades of blue. In fact, the science of color perception and its application in color matching technology for paints, inks, and dyes is a fascinating area of study.
We can measure the light being absorbed and materials can be characterized by their absorption spectrum. An absorption spectrum is often shown as a graphical plot of the amount of light absorbed versus wavelength. Most materials absorb light over a broad range of wavelengths.
While a material's apparent color is most often the result of absorption of light, color can also arise from emission of light. Excited states formed from energy absorption are short-lived because the electron seeks the position of lowest potential energy and the system returns to its ground state. When that happens, the amount of energy absorbed in forming the excited state is released (emitted), usually in the form of heat or light. When the energy is emitted in the form of a photon in the visible region of the electromagnetic spectrum, the material will appear to have color.
In emission, the observed color is produced directly by the energy change; complementary colors are not involved. In a collection of atoms, molecules or ions, many photons are emitted, and they may not all correspond to the same color. This is because not all of the atoms, molecules or ions form the same excited state, and the paths used by different electrons to return to the ground state may not be the same. The emitted photons collectively result in the observed emission spectrum. The eye perceives this as light of a specific color, which is actually a blend of the emitted wavelengths. The spectrum or color is characteristic of the atom, molecule or ion that emitted it, and can be used to test for its presence. When the material is excited by placing it in a flame, the procedure is called a flame test. This simple approach is often useful in identifying materials.
The emission spectra of gaseous elements can be observed by exciting the atoms in a gas filled tube with high voltage and viewing the light from the glowing gas with a spectroscope. The spectroscope separates the emitted light so that you can see the individual wavelengths that contribute to the visible color of the emission. The result is called a line spectrum. The component of the spectroscope that separates the light into its component wavelengths is usually a prism or diffraction grating, and is often called a monochromator.
Similar instruments are used to measure light that is absorbed or transmitted by a substance. A common instrument used for this purpose is a spectrophotometer, also called a colorimeter or spectrometer. Instruments of this type can measure both the amount of light transmitted by the sample (T or %T) or the absorbance of a sample (A = -log T).
In this experiment, you will perform flame tests on solutions containing various ions. When ionic solids are dissolved in water, they produce aqueous cations and anions. For example, adding solid MgBr2 to water will produce ions according to the reaction below.
( 3 )
| MgBr2(s) → | Mg2+(aq) | + | 2 Br-(aq) |
| cation | | anion |
Please consult your textbook for the typical charge of ions in this series of experiments. At the end of the experiment, you will identify the ions in two solutions of unknown composition by performing flame tests and comparing the results with your observations on the solutions of known composition.
Equipment
-
1 Bunsen burner
-
1 Nichrome wire loop
-
1 30 mL beaker
-
1 spot plate
-
1 grease pencil
-
1 deionized water squirt bottle
Reagents
-
15 mL 3 M HCl (aq)
-
5 drops of each known salt solution (0.1 M)
-
5 drops of each unknown salt solution (0.1 M)
Safety
Read the procedure for operating a Bunsen burner in Lab Equipment. Know how to set it up, light it, and operate it safely.
You will be working with hydrochloric acid, HCl (aq). This chemical is corrosive. If you spill it on a surface, wipe it up with paper towels and rinse with water, being careful not to touch the liquid. If you spill it on yourself, immediately rinse the area with lots of water. If it gets in your eyes, flush them with water at the eyewash and have someone notify the TA.
Waste Disposal
The solutions used in this experiment should be collected in a labeled beaker and disposed of in the labeled container.
Prior to Class
Please read the following section in Lab Equipment: Bunsen Burner.
Lab Procedure
Please print the worksheet for this lab. You will need this sheet to record your data.
1
Obtain a wire loop and a spot plate from the set-up area. Using a grease pencil, label the wells on the spot plate with the formulas of the solutions you will be testing. (See Table A for their names.) Make careful note of the unknown numbers you use.
2
Obtain 10 - 15 mL of 3 M HCl in a 30 mL beaker. Add 5 drops of each of the known solutions and the unknown solutions to separate wells of the spot plates. Be sure to match the solution to the properly labeled well!
3
Set up a Bunsen burner. Make sure it is not at the edge of the bench, under the Plexiglas shield or under the shelf above the bench. Light the burner and adjust it to a compact flame. Remember, never leave a lit Bunsen burner unattended!
4
Clean the wire loop as follows: Dip the loop end of the nichrome wire into the HCl(aq) in the beaker and stir the acid gently for a few seconds. Then heat it in the hottest part of the Bunsen burner flame until it glows. When no color is imparted to the flame, the wire is clean. You may have to repeat this process a couple of times. Note that the acid wash accomplishes the cleaning, so give extra attention to this procedure. Also, some clean wires impart a pale yellow color to the flame.
5
Dip the clean metal loop into the well of the solution to be tested and bring the loop (slowly) to the hottest portion of the Bunsen burner flame. Observe and record in Table A the color imparted to the flame. Watch carefully since some colors are very fleeting while others last a relatively long time. Color descriptions might include bright red, deep red, orange-red, orange, yellow, yellow-green, green, blue and violet.
6
Repeat steps 4 and 5 for each of the known solutions; from the data, determine which of the ions present is responsible for the color noted.
7
Test the unknown solutions in the same manner and identify the ions in the unknown. You may wish to look at one or more of the known solutions again if you are not completely sure of the identity of the unknown.
8
When you are finished making your observations, turn off your Bunsen burner, rinse and dry your spot plate and return all equipment to the set-up area where you found it.
9
Before leaving, go to a computer in the laboratory and enter your results in the In-Lab assignment. If all results are scored as correct, log out. If not all results are correct, try to find the error or consult with your lab instructor. When all results are correct, note them and log out of WebAssign. The In-Lab assignment must be completed by the end of the lab period. If additional time is required, please consult with your lab instructor.