
Lab 9 - Solubility Product Constants
Purpose
To measure the solubility product constant (Ksp) of copper (II) iodate, Cu(IO3)2.Goals
-
•To measure the molar solubility of a sparingly soluble salt in water.
-
•To prepare a calibration curve based on complex ion formation for absorbance enhancement.
-
•To calculate the solubility product constant (Ksp) of a sparingly soluble salt from its molar solubility.
-
•To confirm the common ion effect on the molar solubility of a sparingly soluble salt.
Introduction
In previous introductory chemistry courses, you learned some basic solubility rules that are useful in determining if an ionic solid will dissolve in water. Solids that dissolve completely, such as NaCl and NH4NO3, were referred to as "soluble" and others that did not dissolve completely, such as AgCl and BaSO4, were referred to as "insoluble." In fact, very few ionic solids are completely insoluble, meaning that they will not form any ions when placed in aqueous solution. Most solids that are commonly referred to as "insoluble" are actually slightly soluble and will produce an equilibrium between undissolved solid and ions in solution. For example, when copper (II) iodate (Cu(IO3)2) is placed in water, the following equilibrium is established.( 1 )
Cu(IO3)2(s)  Cu2+(aq) + 2 IO3−(aq)
Cu2+(aq) + 2 IO3−(aq)( 2 )
Ksp = [Cu2+][IO3− ]2
Cu(IO3)2(s) Cu2+(aq) + 2 IO3−(aq)
Cu2+(aq) + 2 IO3−(aq)Ksp = [Cu2+][IO3− ]2
is not equal to the Ksp. However, as long as some solid is in contact with solution, the solution will become saturated with the ions according to equation 1Cu(IO3)2(s) Cu2+(aq) + 2 IO3−(aq)
Cu2+(aq) + 2 IO3−(aq)Cu(IO3)2(s) Cu2+(aq) + 2 IO3−(aq)
Cu2+(aq) + 2 IO3−(aq)Cu(IO3)2(s) Cu2+(aq) + 2 IO3−(aq)
Cu2+(aq) + 2 IO3−(aq)Ksp = [Cu2+][IO3− ]2
) to solve for the solubility product constant of Cu(IO3)2.
The preceding discussion referred to dissolving the sparingly soluble salt in pure water. However, if some of the ions that are to be produced by the solid are present in solution from another source, Le Châtelier's Principle predicts that the equilibrium in equation 1 Cu(IO3)2(s) Cu2+(aq) + 2 IO3−(aq)
Cu2+(aq) + 2 IO3−(aq)( 3 )
Cu2+(aq) + 4 NH3(aq) Cu(NH3)42+(aq)
Cu(NH3)42+(aq)Cu2+(aq) + 4 NH3(aq) Cu(NH3)42+(aq)
Cu(NH3)42+(aq)Equipment
-
15 13 × 100 mm test tubes
-
5 stoppers
-
1 test tube rack
-
1 spatula
-
1 glass stir rod
-
1 MicroLab spectrophotometer
-
1 MicroLab spectrophotometer instruction sheet
-
6 vials
-
1 250 mL waste beaker
-
1 deionized water squirt bottle
-
1 box of Kimwipes
Reagents
-
~0.25 g solid Cu(IO3)2
-
~5 mL 5.0 × 10⁻⁴ M Cu(NO3)2
-
~10 mL 1.0 × 10⁻³ M Cu(NO3)2
-
~10 mL 5.0 × 10⁻³ M Cu(NO3)2
-
~5 mL 1.0 × 10⁻² M Cu(NO3)2
-
~5 mL 5.0 × 10⁻³ M KIO3
-
~5 mL 1.0 × 10⁻² M KIO3
-
~5 mL 3 M NH3
-
deionized water
Safety
Cu(NO3)2 is listed as an oxidizer and corrosive. KIO3 and Cu(IO3)2 are listed as strong oxidizing agents. As with all chemicals in the lab, if you come in contact with a solid, you should gently brush off the affected area with a paper towel and then flush the area with water. If you come in contact with a solution, you should flush the affected area with water.Waste Disposal
All solutions generated this week must be placed in the waste bottle in the lab. Designate a "waste" beaker and set it aside for use during your lab. You can put the small samples of solution you will make into this beaker and empty it into the waste bottle at the end of class, instead of going back and forth to the waste bottle. Always remember not to overfill the waste bottle. If your waste bottle is full, please alert your lab instructor.Prior to Class
Please read the following sections of the Introductory Material:Lab Procedure
Please print the worksheet for this lab. You will need this sheet to record your data.
1
A spectrophotometer will be set up in your work area. Make sure it is plugged in and allow it to warm up.
2
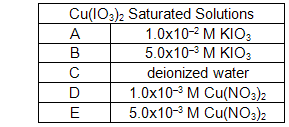
While the spectrophotometer is warming up, label five clean, dry test tubes A - E and set up a beaker for waste.
3
Fill each of the five test tubes to a depth of 4 fingers or approximately 3/4 full with the following solutions.
4
Using the spatula provided, add a small amount of solid Cu(IO3)2 to each of the five test tubes. A "small amount" means just a little bit on the smaller end of the spatula. If the solid dissolves entirely, you can always add some more solid to the test tube.
5
Stopper each of the test tubes. While holding the stopper in place, invert the tubes and agitate the contents for several minutes.
6
Allow the test tubes to equilibrate for a minimum of 10 minutes. Agitate the solutions periodically while you work on your standard solutions.
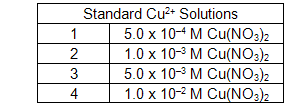
7
Label four additional clean, dry test tubes 1 - 4. These will be the standards for the calibration curve.
8
Fill each of the four test tubes to a depth of 3 fingers or approximately 1/2 full with the following solutions. Try to fill each test tube to the same level.
9
Add 10 drops of 3 M NH3 to each of the four test tubes (1 - 4).
10
With the glass stir rod provided, gently mix each solution so the dark blue color is uniform throughout the test tube. Be sure to rinse and dry the stir rod between solutions to avoid cross-contamination and errors from dilution.
11
Following the detailed instructions for the spectrophotometer provided in lab, take a background spectrum.
12
Take a blank spectrum with deionized water. To condition your vial, carefully pour some deionized water into a vial and pour it out to waste then refill with deionized water.
13
Condition a vial using standard solution 1 and take an absorbance spectrum. Identify the wavelength of maximum absorbance near 600 nm, and record it. Record the absorbance at this wavelength in Table A. Absorbance values are reported to the 0.001. For all remaining absorbance measurements in this experiment, be sure to use the same wavelength you have identified as the maximum. Retain this sample in the vial until you have completed your calibration plot. Students often choose to label a sheet of paper with positions 1, 2, 3, and 4, placing each vial on the appropriate position.
14
Repeat step 13 for each of the remaining standard solutions and record their absorbances in Table A.
15
The MicroLab software will plot the absorbance of the Cu2+ solutions that you made as a function of their concentrations. The trendline and R2 value are displayed. If your plot is linear with an R2 value of 0.9 or greater, continue the experiment. If your R2 value is low, consult with your lab instructor. Record these in Table A. Do not close the MicroLab file, as this calibration curve will be used to determine Cu2+ equilibrium concentrations.
16
Once you are satisfied with your calibration curve, empty the four standard solution vials into your waste beaker and rinse each one with deionized water.
17
Remove the stoppers from the five test tubes labeled A - E that you prepared in steps 3 - 6. Place them in a centrifuge adding one tube filled 3/4 full with deionized water for balance. Centrifuge the tubes for 2 full minutes. Allow the centrifuge to stop on its own so as not to agitate the solid present.
18
Label five additional clean, dry test tubes A - E.
19
Decant each of the five solutions from the centrifuge into the new test tube of the same label. Fill each to a depth of 3 fingers or 1/2 full as you did for the standard solutions in step 8. Again, try to fill them to approximately the same level. When doing this, be careful not to transfer any solid! Do not start to pour and stop because this will stir up the solid and cause you to have to re-centrifuge the solution. If you over-decant, you may pour some back into the tube containing solid.
20
Add 10 drops of 3 M NH3 to each of the five test tubes (A - E).
21
With the glass stir rod provided, gently mix each solution so the dark blue color is uniform throughout the test tube. Be sure to rinse and dry the stir rod between solutions to avoid cross-contamination and errors from dilution.
22
Condition a vial using solution A, refill the vial, measure its absorbance and record this value in Table B. Be sure to use the same wavelength used in the calibration curve. Do not discard the solution until you have completed your measurements of solutions A - E.
23
Repeat step 22 for each of the remaining solutions and record their absorbances in Table B.
24
Once you are satisfied with your results, empty the five vials into your waste beaker and rinse each one with deionized water.
25
When you are finished taking measurements, close the MicroLab software and unplug your spectrophotometer.
26
Collect all your copper solution waste and place it in the waste bottle in the lab, making sure not to overfill it. Rinse and dry all your glassware with water and return it to the set-up area where you found it.
27
Remember to show your TA your calibration curve and calculated Ksp values. Your TA will manually grade the results and enter your score into WebAssign.
28
Before leaving, enter your results in the in-lab assignment. If all results are scored as correct, log out. If not all results are correct, try to find the error or consult with your lab instructor. When all results are correct, note them and log out of WebAssign. The in-lab assignment must be completed by the end of the lab period. If additional time is required, please consult with your lab instructor.