Lab 9 - Titrations
Purpose
To determine the concentration of acetic acid in vinegar.Goals
-
1To perform an acid-base titration.
-
2To gain experience titrating carefully to a visible endpoint.
-
3To gain experience monitoring a titration with a pH electrode and determining the equivalence point.
-
4To calculate the amount of analyte present from the result of a titration.
Introduction
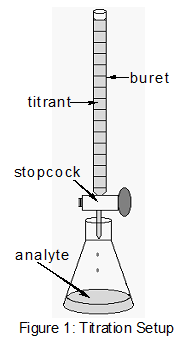
Many laboratories analyze consumer products to determine accuracy in the labeling of the product. One very common and simple analytical technique known as titration will be demonstrated in this experiment. A titration is an analytical procedure in which a reaction is run under carefully controlled conditions. The stoichiometric volume of one reactant of known concentration, the titrant, that is required to react with another reactant of unknown concentration, the analyte, is measured. The concentration of the analyte is determined from the concentration and volume of titrant and the stoichiometry of the reaction between them. The experimental setup is shown in Figure 1. A buret, which contains the titrant, is calibrated so the volume of solution that it delivers can be determined with high accuracy and precision. Titrant is added to the analyte until the stoichiometric volume of titrant has been added. This is called the equivalence point, which, when reached, the volume of titrant delivered by the buret is read. Usually, the volume readings are estimated to the nearest 0.01 mL. The delivery of the titrant is adjusted with the stopcock on the buret. With practice, one can dispense fractions of a drop of titrant and control the procedure well enough that replicated titrations agree within 0.10 mL. For this first lab, you will need your titrations to agree to within 0.50 mL.
Figure 1: Titration Setup
( 1 )
HC2H3O2(aq) + OH–(aq) → C2H3O2–(aq) + H2O(l) ( 2 )
moles HC2H3O2 reacting = moles OH– added( 3 )
moles of acid reacting = moles of base reacting( 4 )
10.2 mL solution ×
= 1.02 mmol NaOH
| 0.100 mmol NaOH |
| 1 mL solution |
(Macid = molesacid / Vanalyte)
. Using the values above, if the titration requires 1.02 mmol of NaOH to reach the endpoint, the sample must also contain 1.02 mmol of acetic acid. If the volume of the vinegar used is 8.05 mL, the molarity of acetic acid is 1.02 mmol / 8.05 mL = 0.127 M.
In this experiment, a carefully measured volume of vinegar (Vanalyte) is placed into a beaker and the mass is determined. The sample of vinegar is then titrated with a NaOH solution of known concentration (Mbase), and the volume of NaOH solution required to reach the endpoint (Vbase) is determined. Vbase, Mbase, and Vanalyte are all known, so the concentration of the acid (Macid) can be determined as described above. In addition, the mass of acetic acid in the sample can be determined from the number of moles present and the molar mass of acetic acid (gacid = MWacid x molesacid). Finally, the mass percent of acetic acid in the vinegar can be determined from the mass of the acetic acid in the sample and mass of the vinegar (analayte) solution that was titrated.
( 5 )
Mass % =
× 100
| mass of acetic acid in sample |
| mass of vinegar solution titrated |
Equipment
-
1MicroLab Interface
-
1MicroLab pH Measurement Instruction Sheet
-
1pH electrode in pH 7.00 buffer
-
110.0 mL graduated cylinder
-
130 mL beaker
-
1100 mL beaker
-
2250 mL beakers
-
125 mL buret
-
1ring stand
-
1clamp
-
1buret clamp
-
1magnetic stir plate
-
1magnetic stir bar
-
1deionized water squirt bottle
-
1box of Kimwipes
Reagents
- ~50 mL 0.5 M sodium hydroxide (NaOH)
- commercial vinegar (HC2H3O2)
- pH 4.00 buffer
- pH 7.00 buffer
- pH 10.00 buffer
- phenolphthalein solution
- deionized water
Safety
NaOH is corrosive. It can attack the skin and cause permanent damage to the eyes. If NaOH solution splashes into your eyes, use the eyewash station immediately. Hold your eyes open and flush with water for at least 15 minutes. If contact with skin or clothing occurs, flush the affected area with water for at least 15 minutes. Have your lab partner notify your teaching assistant and the lab director about the spill and exposure. The chemicals used in this experiment are very dilute so gloves will not be available. Remember to wash your hands with soap and water when the experiment is completed.Waste Disposal
All solutions can be discarded down the sink drain followed by flushing with plenty of water.Prior to Class
Please read the following sections of the Introductory Material: Please review the following videos: Please complete your WebAssign prelab assignment. Check your WebAssign Account for due dates. Students who do not complete the WebAssign prelab assignment are required to bring and hand in the prelab worksheet.Lab Procedure
Please print the worksheet for this lab. You will need this sheet to record your data. In this experiment, you will be using pH electrodes connected to the MicroLab Interface. pH electrodes have a thin glass bulb at the tip. They break easily and are costly to replace. Be careful not to shove the electrode into the bottom of a beaker or drop the electrode. There is a protective guard around the tip, which should remain in place at all times. The guard will not protect against careless treatment. Please use extreme care when using this equipment. Best results in using the electrodes are obtained if:-
•Electrodes are kept in standard pH 7 buffer solution when not in use.
-
•Immediately prior to use, the electrodes are rinsed with deionized water and gently blotted with a Kimwipe, then placed in the test solution.
-
•The electrodes are rinsed and blotted again after the measurement and returned to the pH 7 buffer solution.
Part A: Calibrating the MicroLab pH Electrode
-
1Open the MicroLab program.
-
2Make sure the pH electrode is plugged into the interface.
-
3Calibrate the pH electrode using the MicroLab instructions provided in the lab.
-
4Configure the MicroLab program using the instruction sheet provided.
-
5After the calibration and configuration are complete, measure the pH of each of the three buffer solutions of pH = 4.00 (red), pH = 7.00 (yellow), and pH = 10.00 (blue). Record the value in the digital display into WebAssign as a record of how accurately the probe is calibrated. Make sure the electrode is immersed in the solution and allow for a few seconds equilibration.
Part B: Titration of Vinegar Monitored by pH Probe and Indicator
-
1Obtain a clean, dry 10.0 mL graduated cylinder.
-
2Using a clean, dry 30 mL beaker, obtain about 25 mL of vinegar.
-
3Condition the graduated cylinder with vinegar solution before using it. This is done by adding a little vinegar solution to the graduated cylinder, swirling so that all of the sides are coated with vinegar and then discarding the remaining vinegar. Repeat this procedure 1–2 more times to ensure that the graduated cylinder is conditioned.
-
4Measure the mass of an empty 250 mL beaker and record this value in Data Table A1. Using the 10.0 mL graduated cylinder, transfer 7.0 mL of vinegar into the beaker. Weigh the beaker and vinegar together and record the mass in Data Table A1. Record the volume of vinegar in Data Table A1 as well.
-
5Add ~40 mL of deionized water (do not use the graduated cylinder for this now that it is conditioned for vinegar!) and 3 drops of phenolphthalein solution to the beaker containing the vinegar.
-
6Obtain about 50 mL of ~0.5 M NaOH solution in a clean, dry 100 mL beaker. Record the exact concentration from the bottle of NaOH in Data Table A1.
-
7Condition the 25.0 mL buret with NaOH solution as directed by your instructor, and according to the description in "Volumetric Glassware" in Lab Equipment.
-
8Fill the buret with NaOH and carefully clamp it to the ring stand. Make sure to fill the tip with NaOH solution by draining some solution from the tip into a waste beaker. For this experiment, the titration volumes will be easier to enter into the MicroLab software if the starting volume of NaOH is EXACTLY 0.00 mL.
-
9Carefully slide the stir bar into the 250 mL beaker containing the vinegar solution while tilted to avoid splashing or damage to the beaker. Position the stir plate under the 250 mL beaker and begin stirring slowly.
-
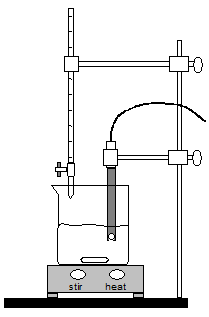
10Carefully position the pH electrode in the 250 mL breaker until about 1/2 inch of the tip is in the solution. Clamp to the ring stand with the clamp provided. Be sure that the stir bar will not strike the pH electrode. If necessary, add more water. See Figure 2 for the complete setup.

Figure 2: Experimental Setup
-
11Position the buret so that the tip of the buret is just inside the beaker. Refer to Figure 2.
-
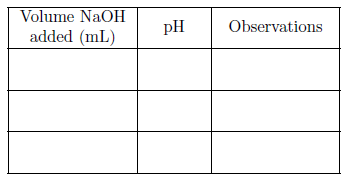
12Take an initial pH reading by entering the initial buret reading in the MicroLab software window and hitting return. You should also record all of your data in Data Table B just in case something goes wrong with the computer. Remember to read the buret to the nearest 0.01 mL. Reading a buret to this accuracy can be tricky; the last significant figure is expected to be an estimate.

Figure 3: Data Table B: Volume of Titrant Added to Vinegar vs pH
-
13Open the stopcock of the buret and add ~2.0 mL of titrant (NaOH) to the contents of the beaker (HC2H3O2 + water + indicator). Stir about 10 seconds. Then read the exact volume on the buret, enter this value into the MicroLab software and take a pH reading. Remember to record your measurements in Data Table B.
-
14Continue to add titrant in ~2.0 mL increments and record the buret volume and pH in Data Table B. Stop at ~8.0 mL of titrant volume.
-
15After ~8.0 mL of titrant has been added, the increment of titrant addition should be decreased as the endpoint is closer. Add titrant in ~1.0 mL amounts until a total of ~11 mL of titrant has been added. Then reduce the amount of titrant addition to ~0.5 mL increments or less. At this point, the pH should change more than 0.3 pH units per addition, signaling the titration endpoint. You will also see a faint pink color appear and quickly fade. When the color begins to disappear more slowly, slow the addition of titrant to a dropwise rate. Rinse the walls of the beaker and the tip of the buret with deionized water from a wash bottle as you approach the endpoint. This ensures that all of the NaOH delivered from the buret ends up in the reaction mixture. The endpoint has been reached when the faint pink color lasts for at least 30 seconds. Record the equivalence point reading on the buret to the nearest 0.01 mL in Data Table A1.
-
16To finish generating the titration curve, return to 1 mL increments of titrant as the changes in pH decrease below 0.3 pH units beyond the equivalence point. Do not stop the titration until you have added approximately 5 mL of titrant beyond the equivalence point.
-
17When you are finished with your titration, stop the MicroLab data collection program. Carefully remove the pH electrode from the solution, rinse it off and place it in the pH 7 buffer.
-
18View the graph generated by the MicroLab titration program to determine the buret volume at which the rate of pH change is the greatest and the slope of the line for mL titrant versus pH is near vertical. This will be your Equivalence Point Buret Reading in Data Table A1.
The following tables are located on the supplemental worksheet.
- Data Table A1: Experimental Data
- Data Table A2: Calculated Results
- Data Table B: Volume of Titrant Added to Vinegar vs pH
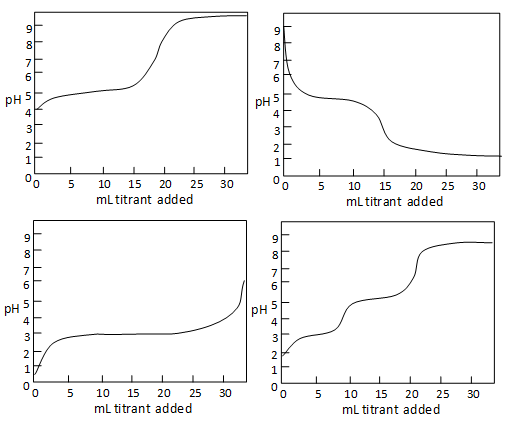
Question 1: The titration curve of a weak acid like acetic acid with base has a distinctive appearance when the volume of titrant is plotted on the x-axis and the pH is plotted on the y-axis. Select the picture that most closely resembles this graph.

Figure 4
Question 2: What is the color of the solution at below pH 8? What is the color of the solution above pH 8? Find pH 8.00 on your titration graph. How close is the amount of titrant at pH 8.00 to the Equivalence Point Buret Reading? Within 0.50 mL? Within 1.00 mL?
Part C: Titration of Vinegar Monitored with Phenolphthalein Indicator
-
1Remove the pH probe from the solution and return it to the pH 7 buffer. Monitoring of the pH and keyboard entry of the volume is not required for this part of the experiment.
-
2Refill the buret with NaOH and carefully clamp it to the ring stand.
-
3Record the initial reading on the buret, to the nearest 0.01 mL in Data Table A1. Reading a buret to this accuracy is tricky. Remember, the last significant figure is expected to be an estimate.
-
4Measure the mass of an empty 250 mL beaker and record this value in Data Table A1. Using the 10.0 mL graduated cylinder, transfer 7.0 mL of vinegar into the flask. Weigh the flask and vinegar together and record the mass in Data Table A1. Record the volume of vinegar in Data Table C as well.
-
5Add ~40 mL of deionized water (Do not use the graduated cylinder for this now that it is conditioned for vinegar!) and 3 drops of phenolphthalein solution to the beaker containing the vinegar.
-
6Open the stopcock of the buret and add some titrant (NaOH) to the contents of the flask (HC2H3O2 + water + indicator). Allow approximately 10-30 seconds for the solution to mix.
-
7Continue to add titrant slowly. As the addition proceeds, you will see a faint pink color appear and quickly fade. When the color begins to disappear more slowly, slow the addition of titrant to a dropwise rate. Rinse the walls of the beaker and the tip of the buret with deionized water from a wash bottle as you approach the endpoint. This ensures that all of the NaOH delivered from the buret ends up in the reaction mixture. The endpoint has been reached when the faint pink color lasts for at least 30 seconds. Record the final reading on the buret to the nearest 0.01 mL in Data Table A1.
-
8When finished, drain the remaining NaOH from your buret into your 100 mL beaker. Discard all solutions in the sink with plenty of water.
-
9Rinse all of your glassware with water, dry it and return it to the set-up area where you found it. Close the MicroLab program.
Question 3: Calculate the number of millimoles of NaOH required to reach the endpoint for each of the titrations. Show one calculation completely. What is the average? Record the values in Data Table A2.
Question 4: How many millimoles of acetic acid are in each vinegar sample? Show one calculation completely. What is the average? Record the values in Data Table A2.
Question 5: What is the mass of acetic acid in each vinegar sample? Show one calculation completely. What is the average? Record the values in Data Table A2.
Question 6: What is the molarity of acetic acid in each vinegar sample? Show one calculation completely. What is the average? Record the values in Data Table A2.
Question 7: What is the mass % of acetic acid in each vinegar sample? Show one calculation completely. What is the average? Record the values in Data Table A2.
Data Table A2: Calculated Results
Question 8: Do you prefer monitoring a titration with a pH probe or an indicator? Explain your choice.
-
10Before leaving, go to a computer in the laboratory and enter your results in the InLab assignment. If all results are scored as correct, log out. If not all results are correct, try to find the error or consult with your teaching assistant. When all results are correct, note them and log out of WebAssign. The InLab assignment must be completed by the end of the lab period. If additional time is required, please consult with your teaching assistant.

