Draw Chemical Structures in Marvin JS

The following sections describe how to draw and edit chemical structures and reactions in Marvin JS.

Important

Do not change your view settings (located under Settings); you might no longer be able to answer the question.

Some Marvin JS tools generate items that can't be graded.

  • Tools that are available only for certain types of Marvin JS questions are indicated with Some questions: If a tool is not displayed, you are not expected to use it to answer the question.
  • Some tools can be expanded so you can select among options for the tool.
    The Zoom tool is open and shows the four zoom modes. The active mode, Zoom to Drawing, is shown as the button label.
    Click and hold the tool to expand it, and then click the option you want to use.

Atoms and Bonds

Task Steps
Add an atom of one of the following elements: H, C, N, O, S, F, P, Cl, Br, I
  1. Click the element symbol.
  2. Click in the drawing area.
Add any atom
  1. Click Periodic table.
  2. Click the element symbol in the periodic table.
  3. Click in the drawing area.
Add an atom list or not list
  1. Click Periodic table.
  2. Click either Atom List or NOT list.
  3. Click the element symbols to be listed.
  4. Click OK.
  5. Click in the drawing area.
Add an atom and its bond to an existing atom
  1. Click the element symbol for the new atom.
  2. In the drawing, drag from the existing atom away until the symbol for the new atom is displayed under the pointer.
Note If you drag to the existing atom, it is replaced by your new atom.
Add two bonded carbon atoms
  1. Click and hold the bond button to expand it.

    This button displays the last selected bond type — by default, single bond.

  2. Click single bond.
  3. Click in the drawing area.
Add a chain of carbon atoms
  1. Click draw chain.
  2. In the drawing, drag until the number of carbon atoms you want to insert is displayed under the pointer.
Some questions: Add an R-group
  1. Click Smart R-group.
  2. Click in the drawing area.
Note If Smart R-group is not available, add any atom and change it to an R-group.
Important Right-clicking an atom and selecting + R-group attachment does not add an R-group.
Replace an atom
  1. Click the element symbol for the new atom.
  2. Click the atom to be replaced.
Change an Atom
Note This can be used to add a query atom or R-group when those tools are not available.
  1. Right-click an atom in the drawing and click Atom properties.
  2. For Change to, select Query or R-group.
  3. Query atoms: Type the label in Atom.
  4. R-groups: For R, click unlock and then type the R number.
  5. Click OK.
Add a bond between existing atoms
  1. Click and hold the bond button to expand it.

    This button displays the last selected bond type — by default, single bond.

  2. Click the bond type you want to use.
  3. In the drawing, drag from one atom to another.
Note

Some bond types are not available for all questions.

If the bond does not end at an existing atom, a carbon atom is automatically added at the end of the bond.

Change a bond type or direction
  1. Click and hold the bond button to expand it.

    This button displays the last selected bond type — by default, single bond.

  2. Click the bond type you want to use.
  3. Click the bond to be changed.
Increase or decrease an atom's charge
  1. Click increase charge button or decrease charge button.
  2. Click an atom. Click until the correct charge is shown.
Note To add a + sign between reactants, see Add a + sign in a reaction.
Some questions: Add radicals or lone pairs to an atom
  1. Click and hold the radical / lone pairs button to expand it.

    This button displays the last selected item — by default, increase radical.

  2. Click either increase radical or increase lone pairs button.
  3. Click an atom. Click until the correct number of radicals or lone pairs is shown.
Some questions: Draw a curved harpoon to show the movement of electrons
  1. Click and hold the electron flow button to expand it.

    This button displays the last selected electron flow arrow — by default, electron flow double arrow.

  2. Click either electron flow single arrow or electron flow double arrow.
  3. Drag from the source electrons (or bond) to the target atom.
    Note

    Candidate source atoms are highlighted when you move the pointer over them.

    If you click a source atom, it is zoomed in so you can drag the source electrons.

    The electron flow arrow points to an incipient bond between the atoms.

  4. Click the electron flow arrow to toggle its target between the incipient bond and the target atom.

Reactions

Task Steps
Some questions: Add a reaction arrow
  1. Click and hold the reaction arrow button to expand it.

    This button displays the last selected reaction arrow type — by default, single reaction arrow.

  2. Click the reaction arrow you want to use.
  3. In the drawing, drag the pointer in the direction the arrow should point.
Some questions: Add a + sign in a reaction
  1. Click the reaction arrow button.
  2. Click in the drawing area.

When adding a + sign, it does not matter what kind of reaction arrow is selected.

Some questions: Add agent names to a reaction arrow

In WebAssign Marvin JS questions, use psuedo-atoms to specify agent names above reaction arrows.

  1. Click and hold the query atom button to expand it.

    This button displays the last selected query atom — by default, A.

  2. Click ?.
  3. Type the label for your pseudo-atom and click OK.

    Subscripts are automatically formatted. For example, type H2O to display H2O.

  4. Click in the drawing area.
Note If the query atom tool is not available, add any atom and change it to a query atom.
Set a mapping number for an atom
  1. Right-click an atom in the drawing and click Atom properties.
  2. For Map, click unlock and then type the mapping number.
  3. Click OK.

Select and Edit

Task Steps
Select a single item
  1. Click either rectangle selection or freehand selection.
  2. Click an item to select it.
Select an entire structure
  1. Click either rectangle selection or freehand selection.
  2. Double-click any part of a structure to select the entire structure.
Select multiple items
  1. Click either rectangle selection or freehand selection.
  2. Click an item to select it.
  3. Hold the SHIFT key and click additional items.
Select items in a rectangular region
  1. Click and hold the selection button to expand it.

    This button displays the last selected selection type — by default, rectangle selection.

  2. Click rectangle selection.
  3. In the drawing, drag to select items.
Select items in an arbitrary region
  1. Click and hold the selection button to expand it.

    This button displays the last selected selection type — by default, rectangle selection.

  2. Click freehand selection.
  3. In the drawing, draw a boundary to select items.
Cut, copy, paste Click cut, copy, or paste.
Note In some browsers, these toolbar items do not work. Instead, use the standard keyboard shortcuts CTRL+X, CTRL+C, and CTRL+V.
Delete items Either:
  • Select items and then click delete.
  • Click delete and then click items to delete them.
Move an item or selected items
  1. Click either rectangle selection or freehand selection.
  2. If needed, select multiple items to move together.
  3. Move the pointer over part of a selected item and drag it to a new location in the drawing.
Note Do not drag the rotation handle or selection border.
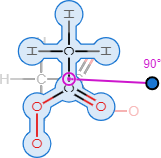
Rotate items in 2 dimensions
  1. Click either rectangle selection or freehand selection.
  2. Select one or more items to rotate.

    A rotation handle is displayed whenever the selection can be rotated.

    selected object rotated 90 degrees
  3. Drag the rotation handle to rotate the selection around its center.
Standardize bond lengths and angles (2-dimensional)

Click clean.

This improves the appearance of your drawing and converts it to 2-dimensional if needed.

Note Because this is a complex operation, the drawing might not be updated immediately.
Some questions: Standardize bond lengths and angles (3-dimensional)

Click clean 3D.

This improves the appearance of your drawing and converts it to 3-dimensional if needed.

Note Because this is a complex operation, the drawing might not be updated immediately.

Zoom and Rotate View

Task Steps
Zoom in or out
  1. Click and hold the zoom button to expand it.

    This button displays the last selected zoom type — by default, zoom in.

  2. Click zoom in or zoom out.
  3. Click the button again to zoom more.
Tip Use the mouse scroll to zoom in or out quickly.
Zoom to drawing
  1. Click and hold the zoom button to expand it.

    This button displays the last selected zoom type — by default, zoom in.

  2. Click zoom all.
Zoom to selection
  1. Select one or more items in the drawing.
  2. Click and hold the zoom button to expand it.

    This button displays the last selected zoom type — by default, zoom in.

  3. Click zoom to selection.
Some questions: Rotate drawing in 3 dimensions
  1. Click 3D rotate.
  2. Drag in the drawing area to rotate the drawing.

    Hold the SHIFT key to constrain rotation to either the x or y axis.